
This the project of a scale with a HX711 module and an Arduino, to measure filaments used in 3D printing.
Weight sensor
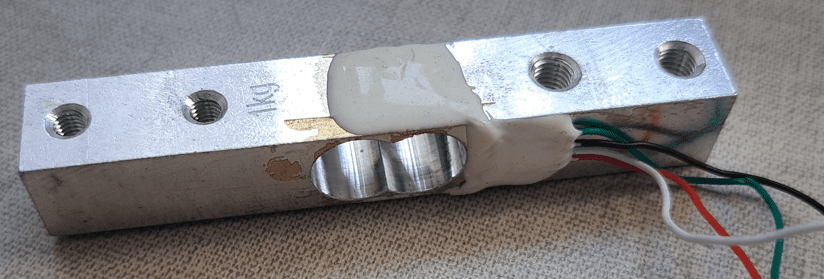
This is a weight sensor or load cell, whose material is usually made of aluminum, carbon steel or stainless steel, it has a small deformation when it receives a mechanical force. Consequently, there is a small variation on sensor’s electric resistance, the sensor’s name is strain gauge.
The load cell used for this project has a maximum capacity of 1kg, which is enough to measure FDM filaments rollers for 3D printing.
Sensor specifications
- Material: aluminum alloy.
- Recommended voltage operation range: between 3 and 12V.
- Maximum operational voltage: 15V.
- Temperature range: between 20ºC(68ºF) and 60ºC(140ºF).
- Nominal power output: 1.0 mV/V ± 0.15 mV/V.
- Repeatability: 0.03% F.S.
Why is the power in mV/V? This is the division of output voltage in millivolts(mV) by the supply voltage when the load cell receives a object with nominal mass. For example, this sensor supplied by 5V, will have an output voltage of 5mV, when it’s measuring 1kg, which is it’s maximum capacity. Repeatability is the variation on reading when the same object is measured many times.
HX711 module
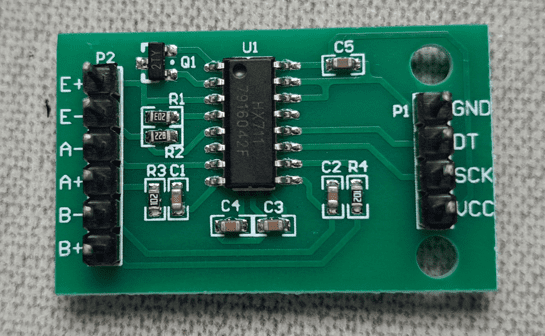
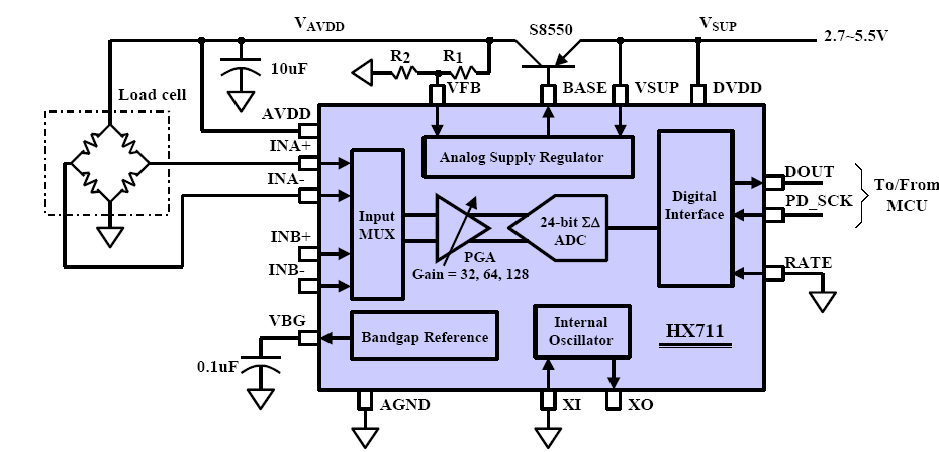
The signal on load cell’s output is still to weak, around millivolts, it’s necessary to amplify this signal so that the microcontroller can read it. And then, comes the HX711, this module is an amplifier and a 24-bits analog-digital converter.
To use on Arduino, click this link to download the library ‘HX711.h’. To install this library in Arduino IDE, click on ‘Sketch’ -> ‘Include Library’ -> ‘Add .ZIP Library…’. And then, click on library file in .zip.
Scale with Arduino
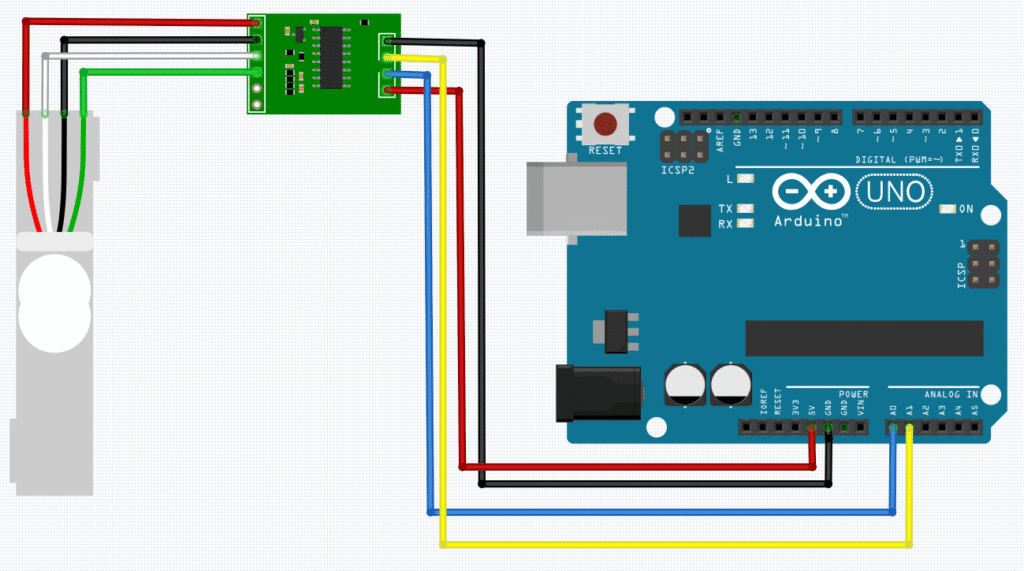
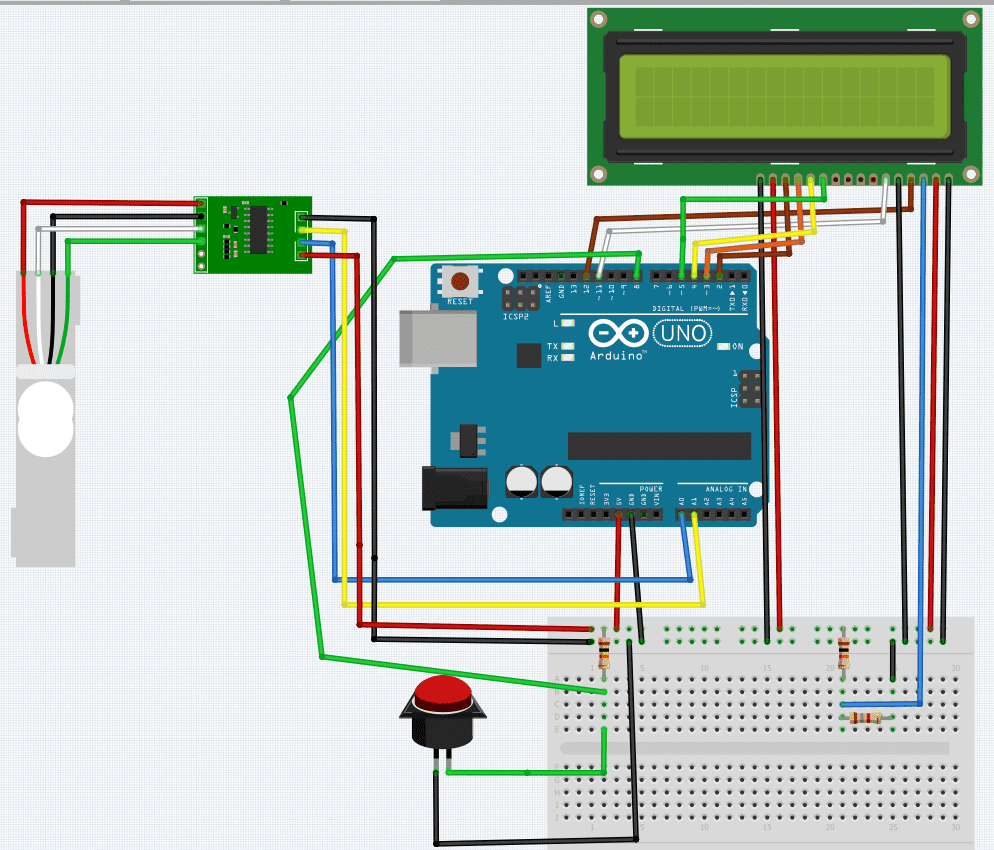
First, must make connections. The black and red wires from load cell must be linked to E- and E+ pins, respectively. While the white and green wires are connected to A- and A+, respectively. On the other side of HX711, VCC and GND pins must be connected to 5V and GND pins on Arduino, respectively. While DT and SCK pins must be linked A1 and A0 terminals on Arduino.
Calibrating the scale
With the finality to find the calibration value, it’s necessary to upload this calibration algorithm on Arduino.
#include <HX711.h> //Library inclusion.
#define DT A1 //Definition of DT and SCK pins.
#define SCK A0
HX711 scale; //Declaring object.
float measure=0;//Declaring variable.
void setup() {
Serial.begin(9600); //Starting Serial screen.
scale.begin(DT,SCK);
scale.set_scale(); //Clearing scale value. Where calibration value is put.
scale.tare(); //Setting balance to zero to ignore structure's mass.
}
void loop() {
measure=scale.get_units(5);//Storing on the variable the average value of 5 //measurements.
Serial.println(measure,3);//Printing the measure with 3 decimal places on Serial.
delay(1000);//Wait 1 second.
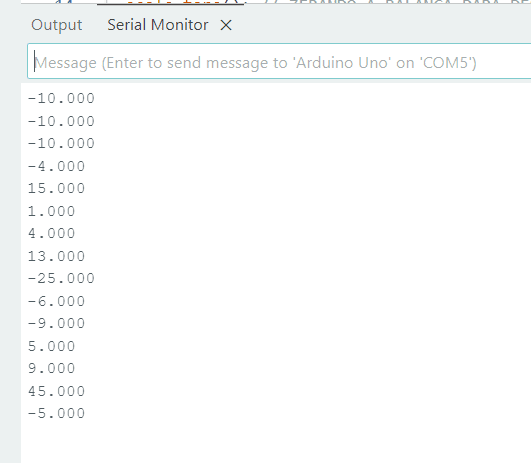
}After code upload, without put anything on weight sensor, you must see a series of random numbers.
Put on scale a weight which you know, for example, a recipient with 500ml of water, whose weight is 500g. With a known weight on scale, you shall see a more coherent sequence of numbers, in my case, this sequence appeared.
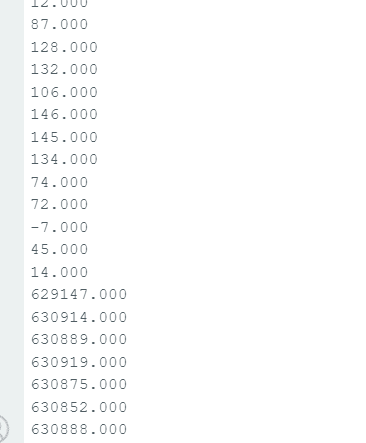
Estimate this sequence’s average value, in my case, the average was 630500, but each sensor will show different numbers, therefore, will have a different average value. This result must be divided by the object’s known weight for calibration.

Then, you must put the calculated calibration value in parentheses on ‘set.scale()’ function. Below, there is the same algorithm, but now with the calibration value.
#include <HX711.h> //Library inclusion.
#define DT A1 //Definition of DT and SCK pins.
#define SCK A0
HX711 scale; //Declaring object.
float measure=0;//Declaring variable.
void setup() {
Serial.begin(9600); //Starting Serial screen.
scale.begin(DT,SCK);
scale.set_scale(1261000); //Clearing scale value. Where calibration value is put.
scale.tare(); //Setting balance to zero to ignore structure's mass.
}
void loop() {
measure=scale.get_units(5);//Storing on the variable the average value of 5 //measurements.
Serial.println(measure,3);//Printing the measure with 3 decimal places on Serial.
delay(1000);//Wait 1 second.
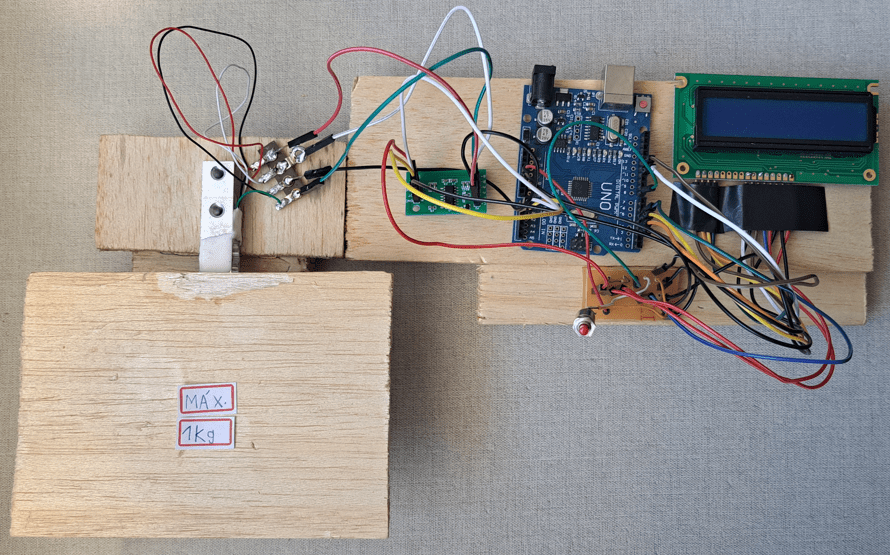
}Scale’s final version
Complete material list:
- 1kg load cell.
- HX711 module.
- Arduino Uno.
- Wires.
- LCD display.
- Switch button with no lock.
- Resistors: 2 of 10kΩ and 1 of 1.8kΩ.
LCD display shows the object’s mass. With the purpose to ignore the roll when measuring the filament, there’s a button, when press it, reading becomes zero.
Post about how to use LCD with Arduino"Click
The scale’s code.
#include <HX711.h>  //Include libraries.
#include <LiquidCrystal.h>

#define DT A1   //Define DT and SCK pins.
#define SCK A0

HX711 scale;   //Declare objects.
LiquidCrystal lcd(12,11,5,4,3,2);

const int button=8;  //Declare variables for button.
int buttonstate=0;

float measure;

void setup() {
  pinMode(button,INPUT);
  lcd.begin(16,2);
  Serial.begin(57600);
  scale.begin(DT,SCK);  //Configuring scale pins.
  scale.set_scale(1261000);//With calibration number.
  scale.tare();  //Serves to set the scale to zero, to ignore structure weight.
  lcd.clear();
}

void loop() {
  buttonstate=digitalRead(button);
  lcd.setCursor(0,0);
  measure=scale.get_units(5);//The average value of 5 measures stored on variable.
  Serial.println(measure,3);
  lcd.print(measure,3);
  lcd.setCursor(5,0);
  lcd.print("kg");
  delay(200);
  if(buttonstate==LOW){
    scale.tare();
  }
}