
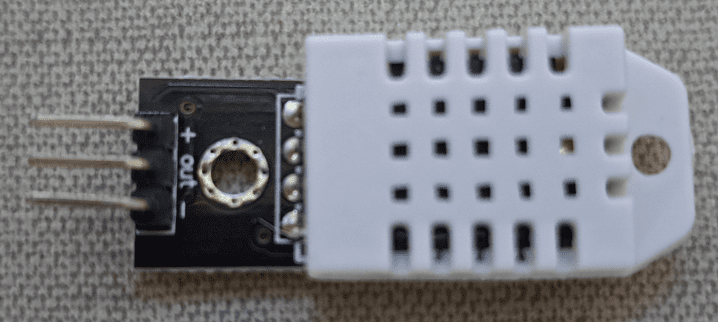
DHT11 and DHT22 are sensors manufactured by Aosong, with a digital output for measurements. Here, it’s shown how to use it on Arduino.
How does it work?
The temperature sensor is an NTC thermistor and the relative humidity sensor is capacitive. By that, a capacitor changes capacitance with air humidity variation. Sensors’ signals go to an 8-bit microcontroller, which sends a serial signal through a single data pin (Signal) to a microcontroller such as Arduino, Raspberry Pi, etc.

Relative humidity is the steam pressure on air divided by saturation steam pressure, the quotient is multiplied by 100 to result in %.
DHT11 parameters
- Supply voltage range: between 3.5V and 5.5V.
- Operation current: 3mA, 60μA on stand-by.
- Temperature measurement range: from 0ºC to 50ºC.
- Precision for temperature measurement: ±2ºC.
- Repeatability for temperature: ±0,2ºC.
- Relative humidity measurement range: from 20% to 90%.
- Precision for relative humidity: 5%.
- Repeatability for relative humidity: ±1%.
- Sampling time: 2 seconds.
Repeatability is the sensor’s capacity to repeat the same measure for a value, when it’s applied many times.
Using DHT11 on Arduino
To make it easier, download the library “dht.h” to include on Arduino’s IDE, the link is here. Below is the algorithm to test this temperature and humidity sensor.
#include <dht.h>
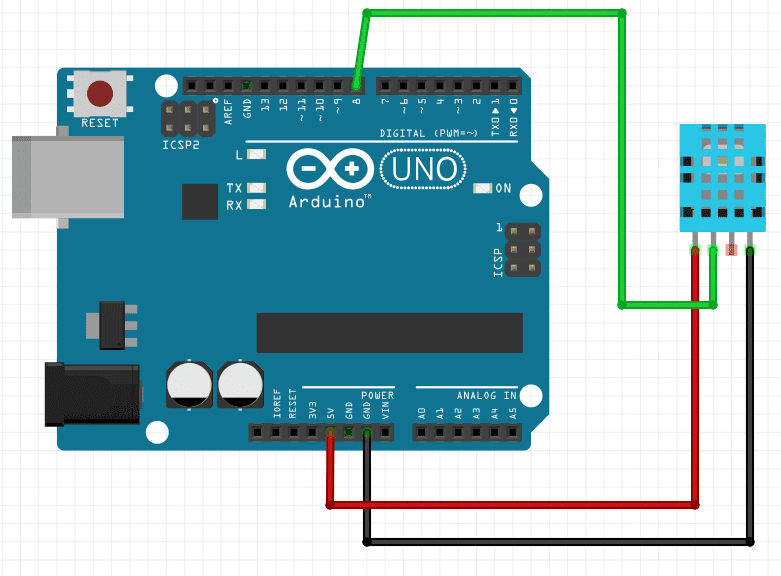
#define outPin 8 // Defines digital pin 8's name.
dht DHT; // Creates DHT object.
void setup() {
Serial.begin(9600);
}
void loop() {
int readData = DHT.read11(outPin);
float t = DHT.temperature; // Reads temperature.
float h = DHT.humidity; // Reads humidity.
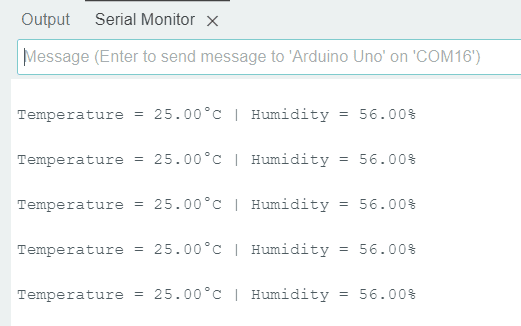
Serial.print("Temperature = ");
Serial.print(t);
Serial.print("°C | ");
Serial.print((t*9.0)/5.0+32.0); // Convert celsius to fahrenheit
Serial.println("°F ");
Serial.print("Humidity = ");
Serial.print(h);
Serial.println("% ");
Serial.println("");
delay(2000); // Wait 2 seconds before measure it again.
}
If it doesn’t work?
It can happen the DHT11 show nonsense measures, for example, 0ºC temperature and 0% humidity in an environment where you know it isn’t in these conditions. It may be necessary to verify connection with Arduino or change the DHT11, this was my case.
The DHT22 sensor
This is an improved version of DHT11, accoding to the datasheet, the improvements are:
- Measurement range for humidity and temperature: between 0 and 100%, and between -40ºC and 125ºC, respectively.
- Temperature measurement precision: ±0,5ºC.
To use the DHT22, it’s necessary to download another library, which allows to use both DHT11 and DHT22, the link is here. The algorithm which tests this sensor.
#include <DHT.h>

#define outPin 8	// Defines the name of digital pin 8.
//#define DHTTYPE DHT11
#define DHTTYPE DHT22

DHT dht(outPin,DHT22);// Creates DHT object. Specifying the type and output pin.

void setup() {
	Serial.begin(9600);
        dht.begin();
}

void loop() {

	float t = dht.readTemperature();// Reads temperature.
	float h = dht.readHumidity();// Reads humidity.

	Serial.print("Temperature = ");
	Serial.print(t);
	Serial.print("°C | ");
	Serial.print((t*9.0)/5.0+32.0);	// Convert celsius to fahrenheit
	Serial.println("°F ");
	Serial.print("Humidity = ");
	Serial.print(h);
	Serial.println("% ");
	Serial.println("");

	delay(2000); // Wait 2 seconds before measure it again.
}
DHT11 and DHT22 with LCD display on Arduino
This project shows temperature and relative humidity in a LCD display. In case you don’t know how to use the display on Arduino, read the Arduino tutorial part 7.
Arduino tutorial (Part 7, LCD)Click here

The code just add commands shown in this post and on tutorial 7.
#include <dht.h>
#include <LiquidCrystal.h>

#define outPin 8	// Defines the name of digital pin 8.

dht DHT;			// Creates DHT object.
LiquidCrystal lcd(12,11,5,4,3,2);

void setup() {
	lcd.begin(16,2);
}

void loop() {
	int readData = DHT.read11(outPin);
        lcd.clear();
	float t = DHT.temperature;	// Reads temperature.
	float h = DHT.humidity;		// Reads humidity.
        lcd.setCursor(0,0);
        lcd.print("Temp:");
        lcd.print(t);
        lcd.print("\337C"); // To show °C on LCD.
        lcd.setCursor(0,1);
        lcd.print("Humidity:");
        lcd.print(h);
        lcd.print("%");
	delay(2000); // Waits 2 seconds before measure again.
}
To use DHT22, just change the sensor, connecting the same terminals and upload the algorithm below.
#include <DHT.h>
#include <LiquidCrystal.h>

#define outPin 8
//#define DHTTYPE DHT11
#define DHTTYPE DHT22

DHT dht(outPin,DHT22);
LiquidCrystal lcd(12,11,5,4,3,2);

void setup() {
  lcd.begin(16,2);
  dht.begin();
}

void loop() {
	lcd.clear();
	float t = dht.readTemperature();// Ler a temperatura.
	float h = dht.readHumidity();// Ler a umidade.
        lcd.setCursor(0,0);
        lcd.print("Temp:");
        lcd.print(t);
        lcd.print("\337C");
        lcd.setCursor(0,1);
        lcd.print("Humidity:");
        lcd.print(h);
        lcd.print("%");
	delay(2000);
}
Video showing the operation of both sensors.