
The MPU6050 module is an accelerometer and gyroscope with 6 axis degrees of freedom. In this post, are shown the operation and a project example.
Click on the following links to know how accelerometers and gyroscopes work.
How the accelerometer works?Click here
How the gyroscope works?Click here
The MPU6050 module
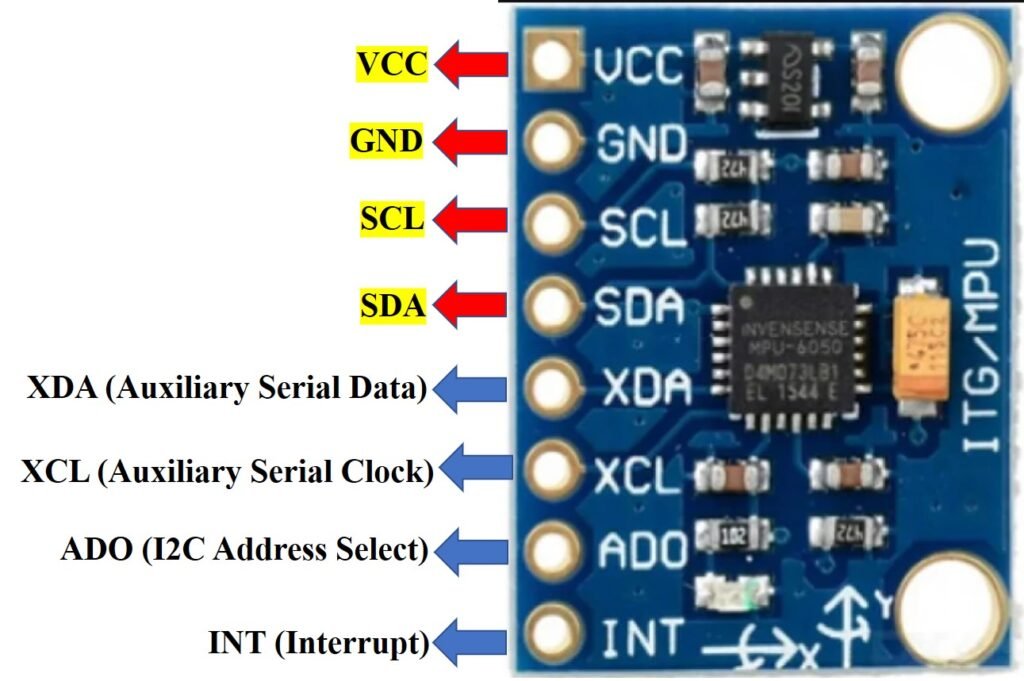
The MPU6050 is a microelectromechanical system (MEMS), with a 3-axis gyroscope, a 3-axis accelerometer, and a temperature sensor. It communicates with Arduino through I2C protocol, using SCL (Serial Clock) and SDA (Serial Data) pins.

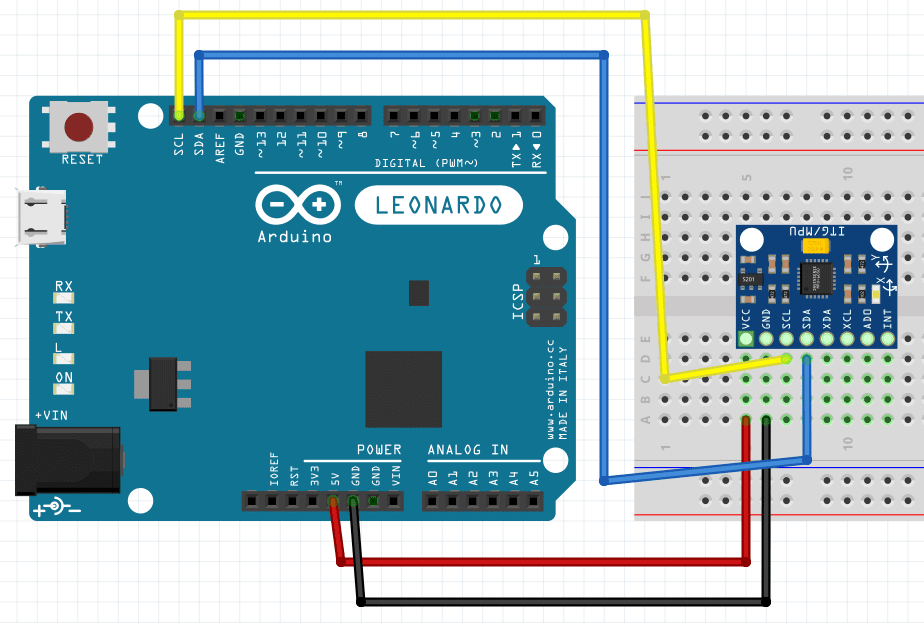
Other MPU6050 pins:
- XDA and XCL: Auxiliaries Serial Data and Serial Clock, form an auxiliary I2C interface to communicate with other sensors.
- ADO: the pin to select an I2C address.
- INT: the interrupt pin, serves to install Arduino when new data can be read.
The temperature sensor and each axis of accelerometer and gyroscope have a 16-bits analog-digital converter, where its data is digitalized. MPU6050 has a Digital Motion Processor (DMP), whose function is to make complex calculations, using the digitalized data. The module also has a FIFO buffer with 1024 bytes to reduce power consumption. FIFO means First In First Out. This is an algorithm that manages data in a line. Temperature operation range: from -40ºC to 85ºC.
Operation demonstration
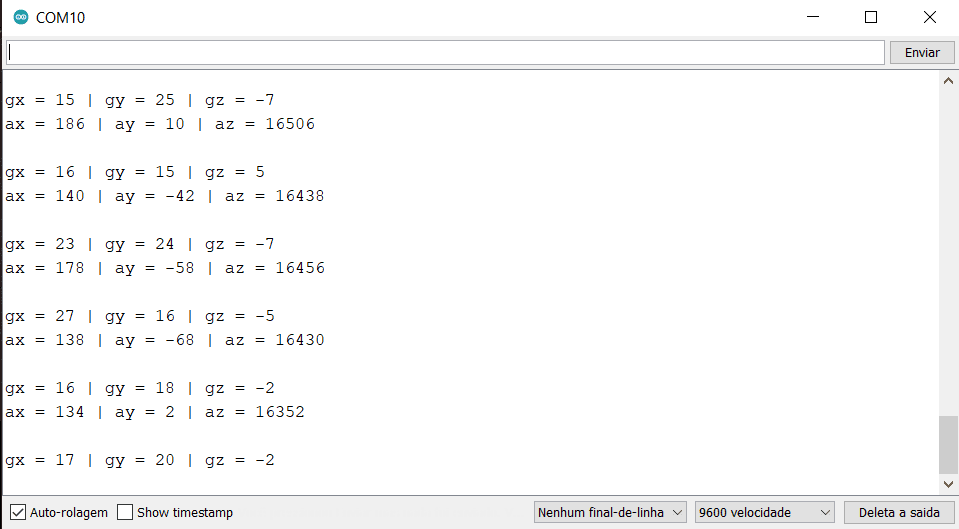
This algorithm is to demonstrate the module’s operation. It needed the “MPU6050.h” library, which can be downloaded on Arduino program’s window. The video below shows how to download the library.
Algorithm to test the module.
#include <Wire.h>  //Necessary libraries.
#include <I2Cdev.h>
#include <MPU6050.h>

MPU6050 mpu; //Module declaration.

int16_t ax, ay, az, gx, gy, gz; //Variable declaration. int16_t is a 16 bit
                                //int variable without signal.
//Variables with 'a' are accelerometer's axis and 'g' are gyroscope's axis.
void setup() {
  Serial.begin(9600);  //Initialize the Serial screen.
  Wire.begin();  //Initialize I2C communication.
  mpu.initialize(); //Initialize the module.
  if(!mpu.testConnection()){
    while (1);
    }
}
void loop() {
  mpu.getMotion6(&ax, &ay, &az, &gx, &gy, &gz); //Function that makes the
                            //readings of accelerometer and gyroscope axis.
  Serial.print("ax = ");
  Serial.print(ax);
  Serial.print(" | ay = ");
  Serial.print(ay);
  Serial.print(" | az = ");
  Serial.print(az);
  Serial.print("\n");
  Serial.print("\n");
  Serial.print("gx = ");
  Serial.print(gx);
  Serial.print(" | gy = ");
  Serial.print(gy);
  Serial.print(" | gz = ");
  Serial.print(gz);
  Serial.print("\n");
  delay(500); //To read the data on screen.
}
The problem with code above is that provided data don’t indicate directly angle and acceleration values. To show gyroscope values in degrees and accelerometer in multiples of g (gravity acceleration), you can download the library “MPU6050_light.h”, whose link is here. This library has an example called GetAllData.ino, which shows the measures in a better shape.
Mouse with MPU6050 and Arduino
In this project, the mouse cursor is controlled by Arduino using MPU6050. It’s a mouse that does not need to be on a surface. Only works with Arduino Leonardo.
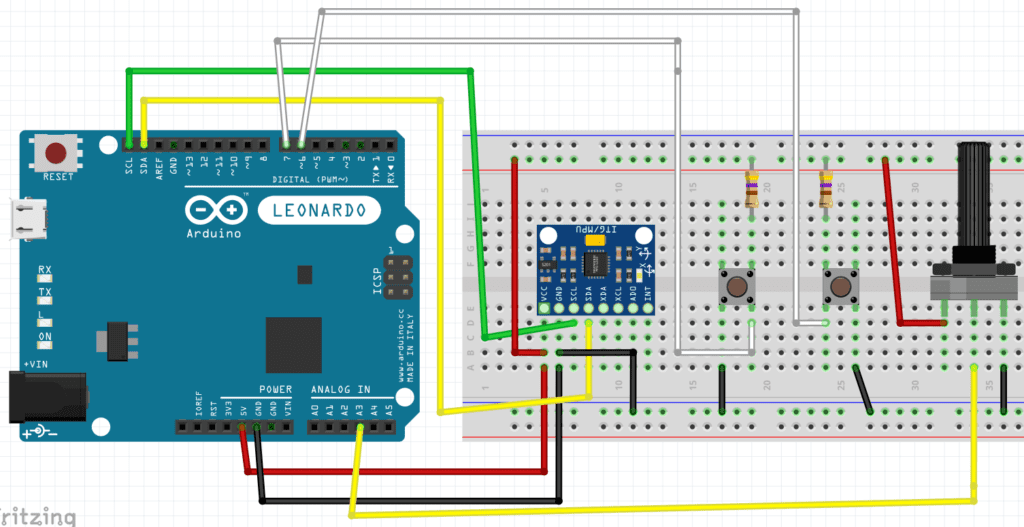

The following code. Must be included the “Mouse.h” library, which is already on Arduino program’s Sketch.
#include <Wire.h>
#include <I2Cdev.h>
#include <MPU6050.h>
#include <Mouse.h>

const int pot=3;  //Declaration of variables of potentiometer on
                  //analog pin A3.
int potentiometer=0;

MPU6050 mpu;
int16_t ax, ay, az, gx, gy, gz;
int vx, vy;       //These variables serve to move mouse cursor.

int button1 = 6;  //Buttons variable.
int button2 = 7;
int buttonState1 = 0;
int buttonState2 = 0;

void setup() {
  Serial.begin(9600);
  Wire.begin();
  pinMode(button1, INPUT);
  pinMode(button2, INPUT);
  pinMode(pot,INPUT);
  mpu.initialize();
  if (!mpu.testConnection()) { while (1); }
}

void loop() {
  potentiometer=analogRead(pot);
  potentiometer=map(potentiometer,0,1023,-3,3);//This function convert
                               //analog values from 0 to 1023 to -3 a 3.
  analogWrite(3,potentiometer);

  mpu.getMotion6(&ax, &ay, &az, &gx, &gy, &gz);

  vx = (gx+15)/150;  //Calculating vx and vy values.
  vy = -(gz-100)/150;

  Serial.print("gx = ");
  Serial.print(gx);
  Serial.print(" | gz = ");
  Serial.print(gz);
  Serial.print("        | X = ");
  Serial.print(vx);
  Serial.print(" | Y = ");
  Serial.println(vy);

  Mouse.move(vx, vy,potentiometer);//Functions to move mouse cursor.

  if(potentiometer<=1 || potentiometer>=-1){ //The mouse wheel don't move if
                           //the third value is inside this range.
      Mouse.move(vx, vy,0);
  }
  buttonState1 = digitalRead(button1);
  buttonState2 = digitalRead(button2);
 if (buttonState1 == LOW) {
    Mouse.press(MOUSE_LEFT); //Function that presses mouse button.

    delay(100);
    Mouse.release(MOUSE_LEFT);//Function that releases mouse button.
    delay(200);
  }
  else if(buttonState2 == LOW) {
    Mouse.press(MOUSE_RIGHT);
    delay(100);
    Mouse.release(MOUSE_RIGHT);
    delay(200);
  }
  delay(80);
}
Video showing the operation.